

Surf photography tips that capture action and culture
- Fernando Antunes

- May 4
- 10 min read
TL;DR:
Shore-based photography with telephoto lenses is safest and best for building surf photography skills.
Use shutter speeds of 1/1000s or faster to freeze fast-moving surfers and wave spray effectively.
Observing the lineup beforehand and shooting during golden hour enhances photo quality and captures the surf culture.
Freezing the perfect surf moment sounds simple until you’re standing on a windy beach watching a 6-foot wave swallow your subject in a blur of white water. Surf photography challenges even experienced shooters because everything moves fast, light shifts without warning, and one wrong setting means a card full of unusable images. The good news is that a handful of proven techniques can transform your travel shots from vague silhouettes into sharp, dramatic images that genuinely tell the story of surf culture. This guide walks you through every stage, from shore-based starter setups all the way to your first cautious session in the water.
Table of Contents
Key Takeaways
Point | Details |
Start from shore | Begin on land with telephoto lenses for safety and reliable surfer shots. |
Master basic settings | Set shutter speed to 1/1000s or faster for sharp, freeze-frame surf images. |
Time and anticipate | Observe the lineup and shoot during golden hour for the best light and action. |
Safety above all | Understand your limits and prioritize safety before attempting water photography. |
Less is more | Focus on simple gear and intentional shooting for authentic surf storytelling. |
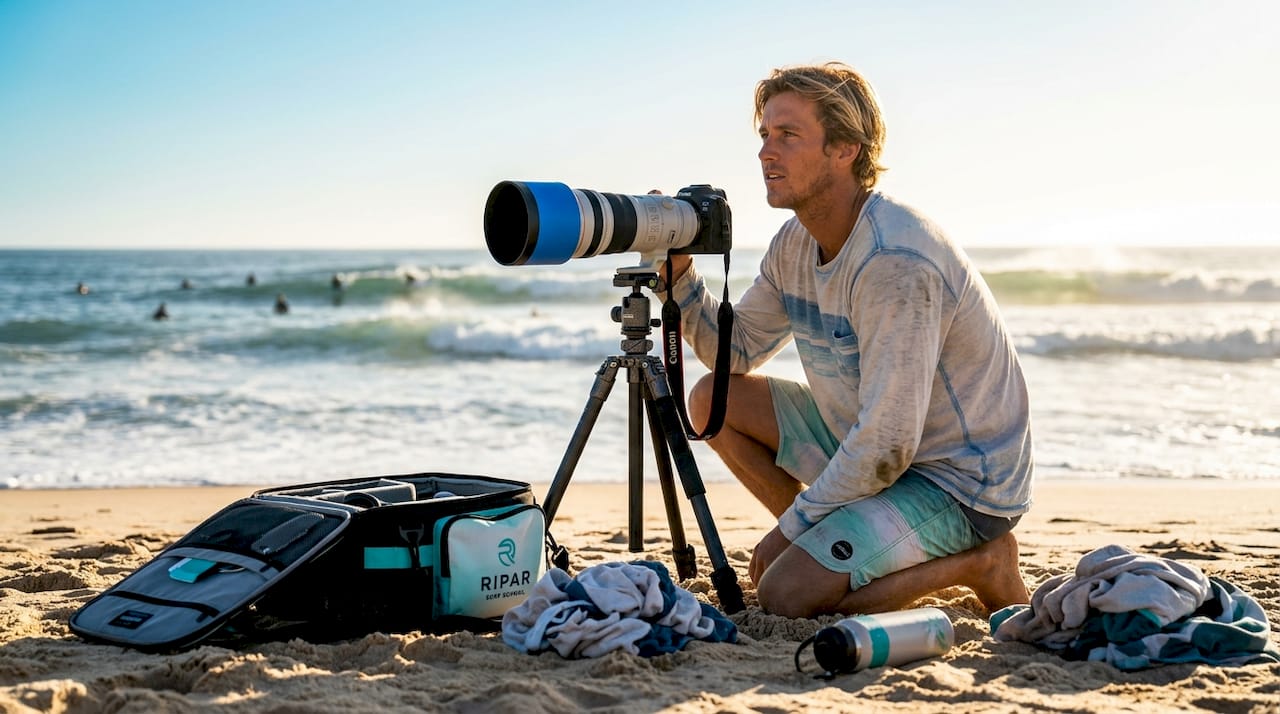
Start on shore: The safest launchpad
With the context set, let’s ground your surf photography journey in the safest, most controlled environment—on land.
Shore-based photography is recommended for beginners because it keeps gear safe and allows telephoto lenses between 200mm and 600mm to isolate surfers cleanly against the wave. This is not a compromise. It is genuinely the best way to build your eye without risking an expensive camera body in salt water.
Shooting from the beach gives you a stable platform, freedom to experiment with angles, and time to study wave patterns without worrying about currents or crowds in the lineup. You can walk the sand, shift your position to catch backlit spray, or crouch low for a more dramatic perspective. None of that is possible when you are treading water 30 meters from shore.
A long telephoto lens compresses the scene beautifully, stacking the surfer against the wave face in a way that wide angles can never achieve. Praia Areia Branca, where we are based near Peniche and Ericeira, offers stretches of elevated dune and cliff where a 300mm lens can frame a surfer in a full tube without touching the water. Understanding your basic surf gear setup before you even pick up a camera makes choosing the right lens far less overwhelming.
Starter gear checklist for shore-based surf photography:
A DSLR or mirrorless camera with manual or semi-automatic controls
Telephoto lens in the 200-400mm range (a 70-300mm zoom is a practical and affordable starting point)
UV filter to protect the front element from salt spray and sand
A sturdy camera strap with a non-slip shoulder pad
Lens cloth and a small blower brush for sand particles
Polarizing filter for cutting glare off water on bright days
Essential surf equipment knowledge to recognize the action you are photographing
Pro Tip: Position yourself with the sun behind your shoulder so light falls directly on the surfer’s face and the wave front. Early morning sessions at most Portuguese beach breaks put the sun in this ideal position for at least the first hour after sunrise.
Being on dry land also means you learn the language of waves at a pace that suits you. You start noticing how a wave feathers at the lip before it breaks, giving you a split-second warning to press the shutter. That observation skill is priceless and transfers directly to water shooting later.
Key camera settings for surfing action
Once you’re comfortable with your location, leveling up your surf shots relies on nailing a few camera settings for crisp action.
Shutter speed of 1/1000s or faster consistently freezes action including airborne spray, fins clearing the lip, and fast tube sequences. Anything slower and you will see motion blur on the critical edges of the shot, which destroys the energy of a powerful maneuver. On bright Portuguese summer days, hitting 1/1600s or even 1/2000s is realistic without pushing ISO into noisy territory.
Setting | Recommended range | Why it matters |
Shutter speed | 1/1000s or faster | Freezes fast movement and spray |
Aperture | f/4 to f/8 | Keeps subject sharp with some background blur |
ISO | Auto, capped at 800-1600 | Controls noise in changing light |
Focus mode | Continuous AF (AI Servo / AF-C) | Tracks moving subjects automatically |
Drive mode | High-speed burst | Captures the peak of each maneuver |
Building skills on shore before water entry also gives you time to internalize these settings until adjusting them becomes second nature. Running through a checklist before each session takes less than a minute and prevents the frustration of discovering mid-session that you were shooting at ISO 3200 in full sun.
Step-by-step settings checklist:
Set shutter speed to at least 1/1000s as your baseline
Choose aperture between f/4 and f/8 depending on how much background separation you want
Enable Auto ISO with a ceiling of 1600 to let the camera handle exposure shifts
Switch focus to continuous tracking mode
Turn on high-speed burst shooting (usually 8-20 frames per second on modern cameras)
Check your histogram after the first few frames and dial in exposure compensation if highlights are clipping
Bright surf environments fool camera meters regularly. White foam and glittering water cause the camera to underexpose the surfer, leaving faces dark and suits muddy. Adding plus one stop of exposure compensation corrects this in most situations, though always verify on the histogram rather than trusting the LCD preview in direct sunlight. If you are also planning a trip and need a base close to Portugal’s best waves, comfortable surf travel accommodations can make early morning sessions much easier to commit to.
Pro Tip: Save your optimal settings as a custom profile (C1 or C2 on most cameras). When a set rolls through unexpectedly, you can switch to your surf profile instantly instead of fumbling through menus while the action passes. A dedicated detailed camera gear guide can help you understand which camera models offer this feature before you buy.
Timing, light, and lineup: Capturing the perfect wave
Now that you’re set on gear and settings, mastering timing and environmental conditions unlocks memorable images.
Watching the lineup for 10 to 15 minutes before shooting allows you to identify the most skilled surfers, recognize where they consistently take off, and predict when maneuvers like bottom turns, cutbacks, and barrel attempts will happen. This preparation phase separates photographers who fill cards with mediocre shots from those who come away with a handful of genuinely strong images.
Study a single surfer for several waves before following them through your viewfinder. Notice whether they favor a frontside or backside approach on a given break. Watch whether they kick out early or push to the close-out section. Understanding these habits lets you pre-focus on the zone where the action will peak rather than chasing the shot after it has already passed.
The golden hour at sunrise and sunset delivers the best light for surf photography, and offshore winds during these periods often groom waves into clean, glassy faces that photograph dramatically. Checking a surf forecast the night before tells you wind direction, swell size, and period, all of which influence both wave quality and light behavior.
Comparison: morning vs. evening sessions
Factor | Morning (sunrise) | Evening (sunset) |
Crowd level | Usually lighter | Heavier in summer |
Light direction | Side to front lit | Warm, dramatic backlight |
Wind conditions | Often calmer offshore | Variable, sometimes onshore |
Water clarity | Typically cleaner | Churned by afternoon activity |
Surf mood | Fresh and energetic | Relaxed, social atmosphere |
“The best surf photos are made by people who understand waves, not just cameras. Spend more time watching and less time shooting until you can predict what happens next.”
For traveling photographers, researching your destination’s tidal patterns, peak swell windows, and local break behavior pays enormous dividends. Planning around surf lessons at a local school is one surprisingly effective way to gather this insider knowledge quickly. Instructors know exactly which direction the light falls at a specific spot, which tides expose the best reef sections, and when the crowds thin out. Understanding beginner lineup basics also helps you read the social dynamics of the water so you know which surfers to follow with your lens. For more creative composition approaches, browsing a surf photography blog can open up fresh ideas about angle and framing.
Water shooting: Beyond the shore (when you’re ready)
Ready to get wetter? For many, shooting in the water is the next frontier, but it deserves a careful approach.
Water photography requires a wide-angle or fisheye lens between 10mm and 35mm, a dedicated water housing, swim fins, and a wetsuit suited to local water temperatures. Portugal’s Atlantic water sits around 16-18 degrees Celsius even in summer, so a 3mm shorty wetsuit is the practical minimum at Areia Branca. Strong swimming ability and genuine ocean awareness are prerequisites, not optional extras.
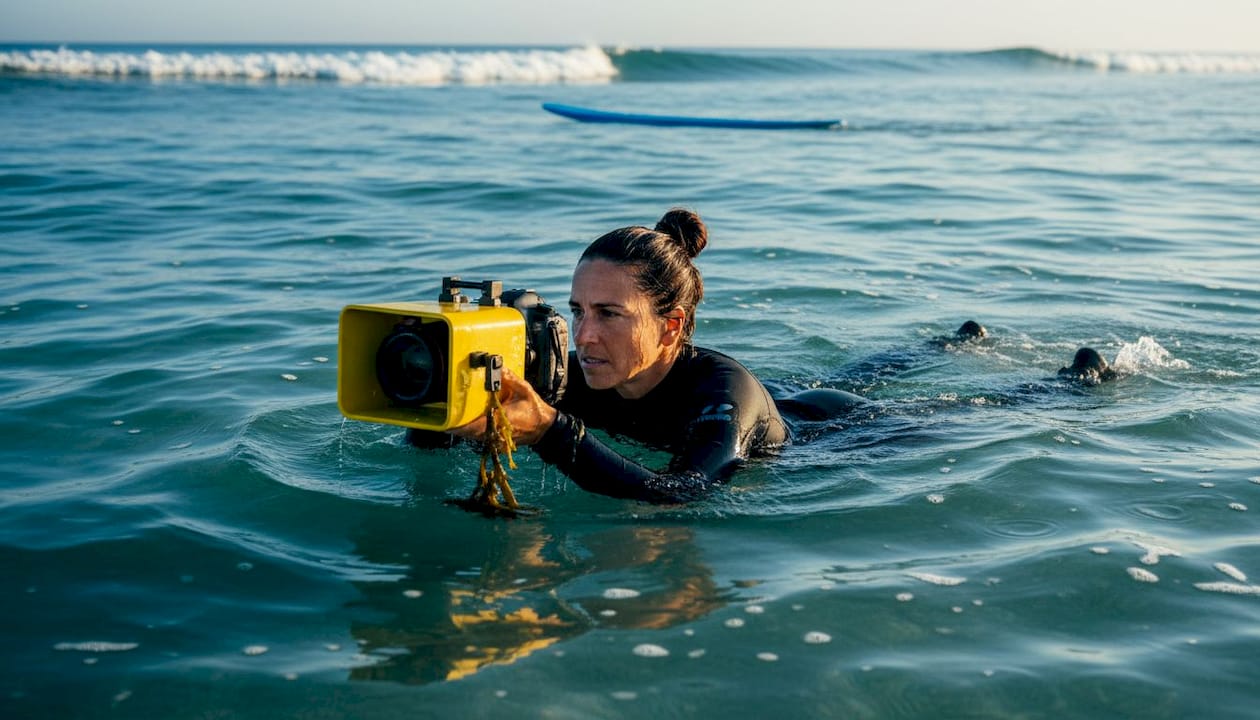
The temptation for beginners is to grab the widest angle possible and wade straight in to get those iconic POV barrel shots. Resist this. Longer lenses in the 80-90mm range are actually safer for beginners shooting from the water because they allow more distance between you and the surfer, reducing collision risk significantly. These same lenses also let you experiment with slower shutter speeds between 1/30s and 1/60s to introduce creative motion blur while keeping the surfer’s face relatively sharp using panning technique.
Essential water photography gear:
Underwater housing rated for your specific camera body
Wide-angle lens for close approach shots (only when experienced)
Medium telephoto for safer distance shooting as a beginner
Bodyboard fins (shorter and more maneuverable than scuba fins)
3mm to 5mm wetsuit depending on season
Wrist leash for the housing
Antifog inserts for the dome port
Safety and etiquette guidelines:
Know your limits, escape rip currents parallel to shore, and never shoot alone in heavy surf
Position yourself on the shoulder of the break, not directly in the impact zone
Make eye contact with surfers to signal your presence before paddling into position
Never drop inside of a surfer who is already riding a wave
Always tell someone on shore where you are entering the water
Browsing in-water photo examples from professional surf photographers before your first session gives you a realistic picture of the distances, angles, and positions involved. Many beginners underestimate how far even a wide-angle lens requires you to be from the surfer to frame the shot correctly.
A perspective you won’t hear elsewhere: Why beginners should embrace simplicity
Here is the honest truth that most surf photography content avoids. Beginners almost universally believe they need more gear, more risk, and more aggressive positioning to get great shots. The instinct is understandable because the most celebrated surf images look impossibly close and impossibly sharp. What those images do not show is the decade of ocean reading, the hundreds of failed sessions, and the deep familiarity with a single local break that made them possible.
Chasing complexity too early is the single fastest way to plateau. A photographer who spends three months obsessing over housing options and waterproof bags will take far fewer photos than someone who grabs a 300mm lens, plants themselves on the sand at golden hour, and commits to understanding one specific break intimately. Simple setups force you to develop the most transferable skill in surf photography, which is anticipation. You cannot spray and pray your way to a great water shot, but you can absolutely get there from the beach if you train your eye first.
Less is genuinely more here. Shooting 50 intentional frames per session with clear compositional intent produces faster growth than firing 2,000 bursts and hoping the algorithm lands on something usable. The photographers whose work we consistently admire are not the ones with the longest equipment lists. They are the ones who know exactly when to press the shutter.
Slowing down also makes surf travel richer. When you are not anxious about missing every possible shot, you start noticing the culture around the surf: the way a local shaper talks about foam density, the pre-dawn ritual of checking the swell app over coffee, the spontaneous conversations in the parking lot. Those details, captured thoughtfully, tell a more complete story than any action shot. For ideas on making the most of your surf trip beyond just the photography, you might find that slowing down is actually the biggest upgrade available to you right now.
Ready to capture more—and surf more?
If reading this has made you eager to practice these techniques in a real surf setting, we have exactly the environment for it.
At Ripar Surf School and Surfcamp in Praia Areia Branca, our group and private surf lessons create natural, repeatable action sequences that are ideal for beginner photographers looking for practice subjects. Small class sizes mean you can set up on the beach, track individual learners through their sessions, and experiment with different settings without pressure. Our surf photo inspiration gallery shows the variety of shots possible right here on this stretch of the Portuguese coast, from long barrel sequences to candid culture moments in the village. Book a surf camp stay and you get early access to morning sessions, local knowledge about the best shooting positions, and an immersive community experience that feeds both your photography and your love of the ocean.
Frequently asked questions
What is the best camera setting to freeze surfers in action?
Use a shutter speed of 1/1000s or faster to consistently freeze water movement and surfer motion. On bright days, pushing to 1/1600s gives you an extra margin of sharpness without significantly raising ISO.
Do I need to shoot surf photos from the water to get great images?
No. Shore-based telephoto shooting with lenses between 200mm and 600mm produces dramatic, compressed images that capture the full power of a wave and are often more visually compelling than close-up water shots.
When is the best time of day for surf photography?
Golden hour at sunrise or sunset delivers the warmest, most directional light and is consistently the most flattering window for surf images. Morning sessions typically offer calmer winds and lighter crowds as a bonus.
How can I predict good surfing action before I start shooting?
Watching the lineup for 10 to 15 minutes lets you identify the most skilled surfers and recognize their preferred takeoff zones and maneuver patterns, so you can pre-aim your lens where the action will peak.
What safety tips should beginners follow in surf photography?
Always know your limits and never shoot alone in heavy surf conditions. If caught in a rip current, swim parallel to the shore to escape it rather than fighting directly against the flow toward the beach.
Recommended
Comments